

无后门已加密,放心部署,无加密版本源码上面购买,可自主添加后台,本人收徒会的全教,本站全为自己技术
Python搭建爬虫代理 IP 池(在服务器上)使用说明(有部署教程视频)
一、查看项目演示(成品项目,部署在服务器上):
请求代理ip接口(演示):http://demo.spiderpy.cn/get/
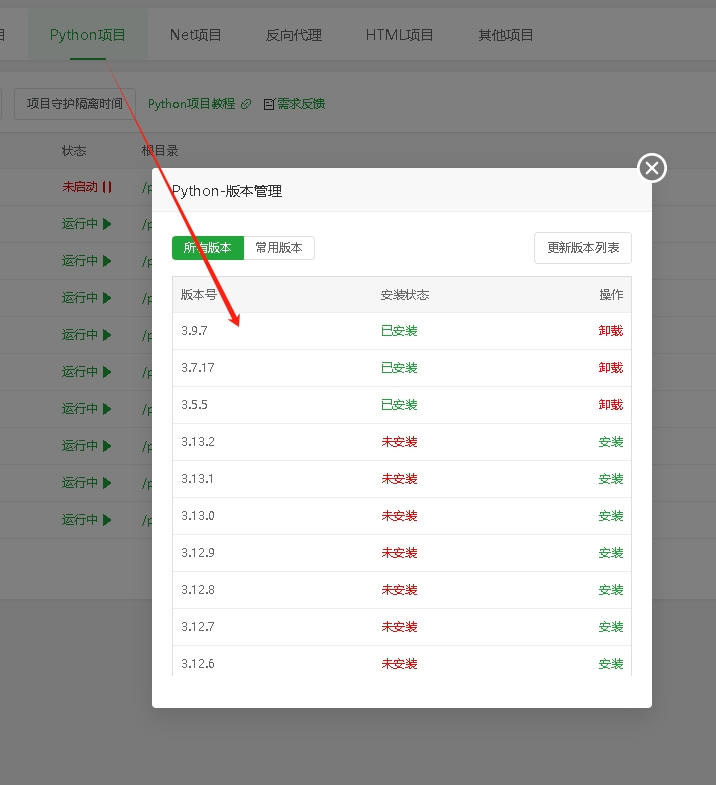
二、安装 Python环境。
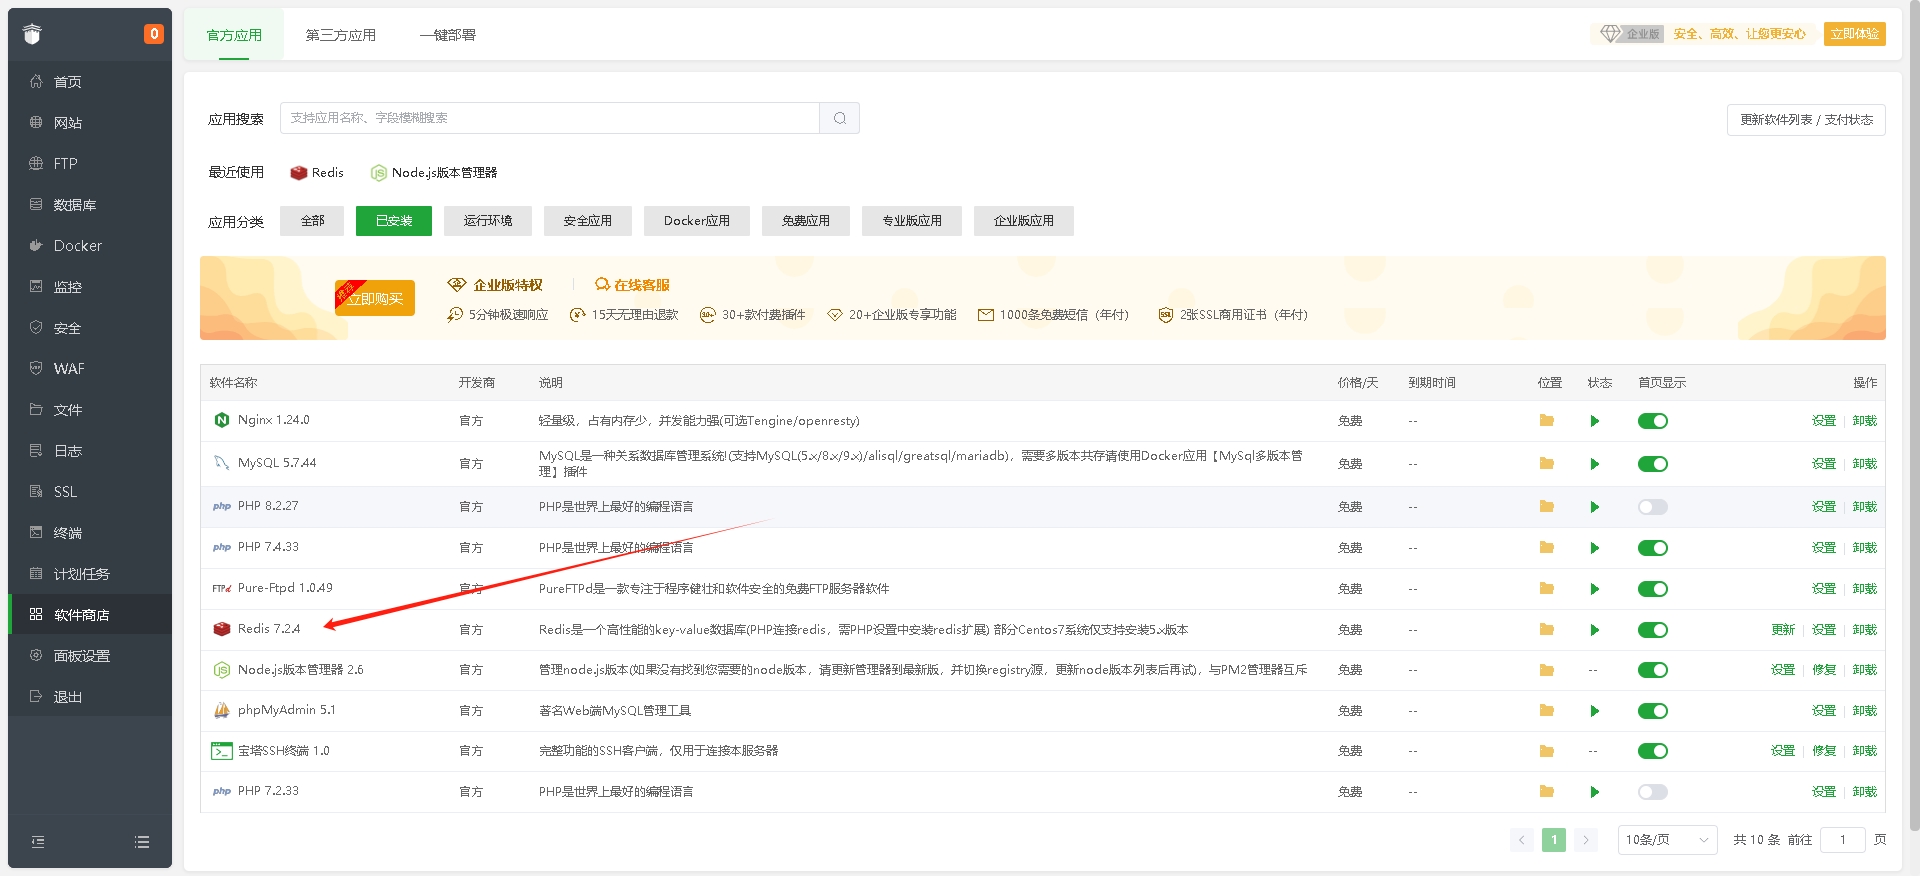
三、安装 REDIS,默认端口,默认设置(需要用到密码,默认:aiwrite_1234)。

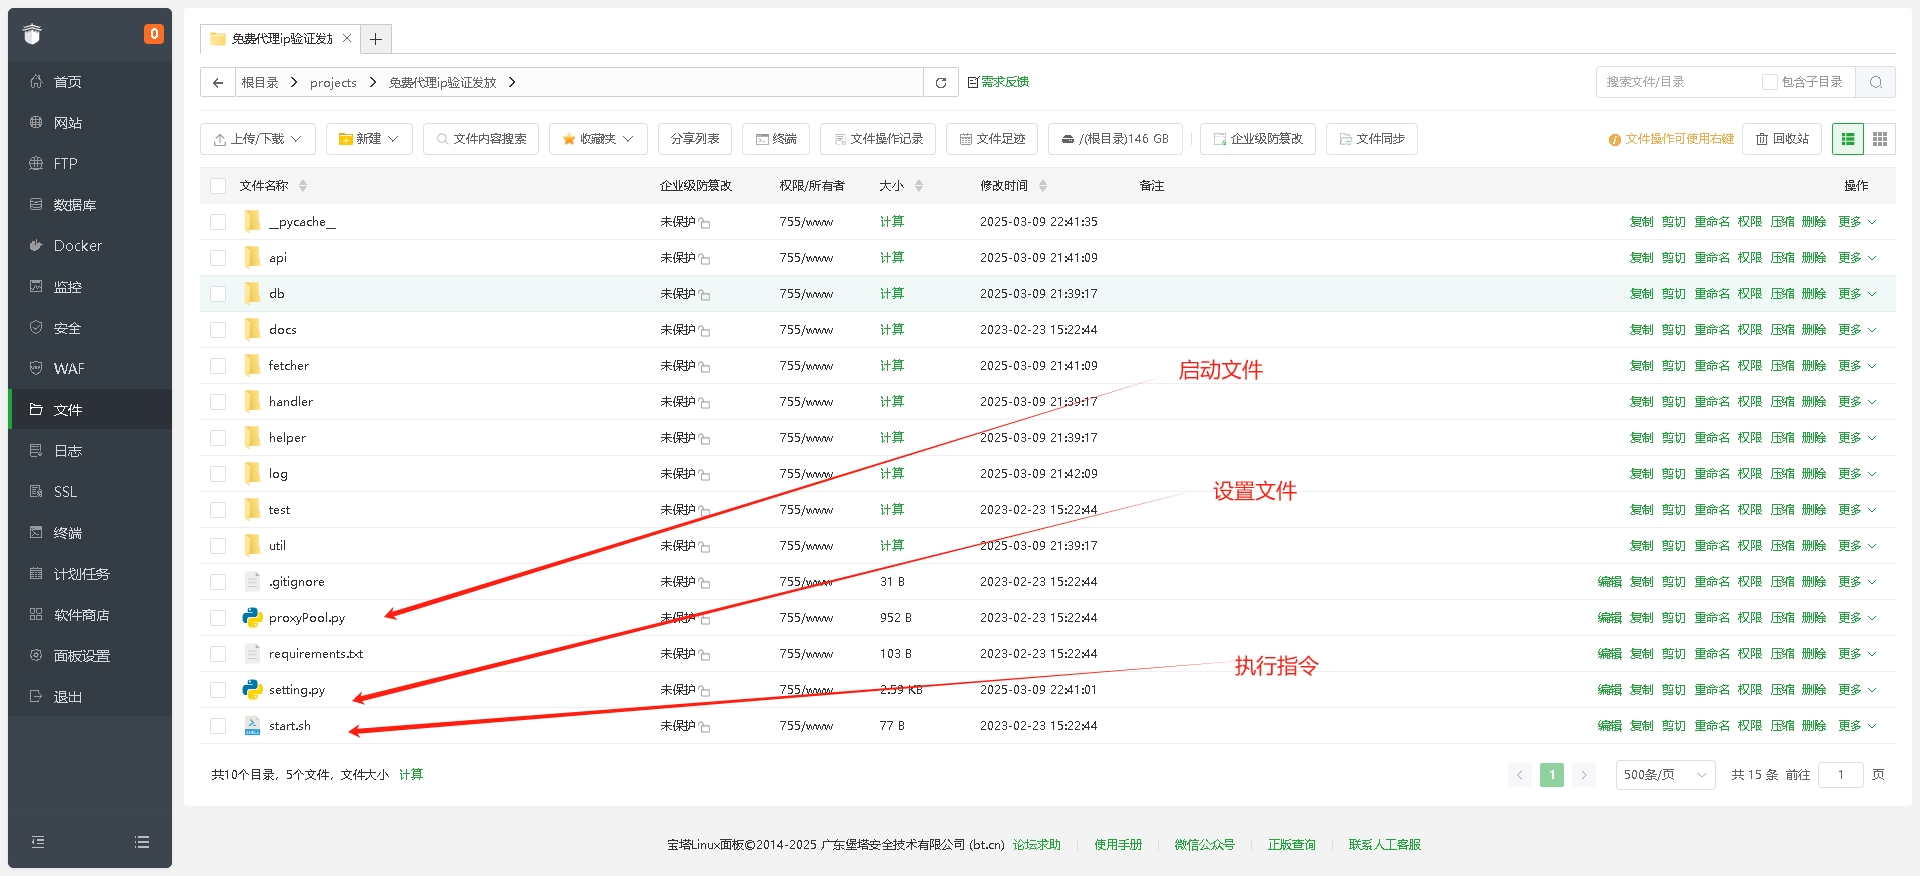
四、上传安装源码到服务器宝塔面板
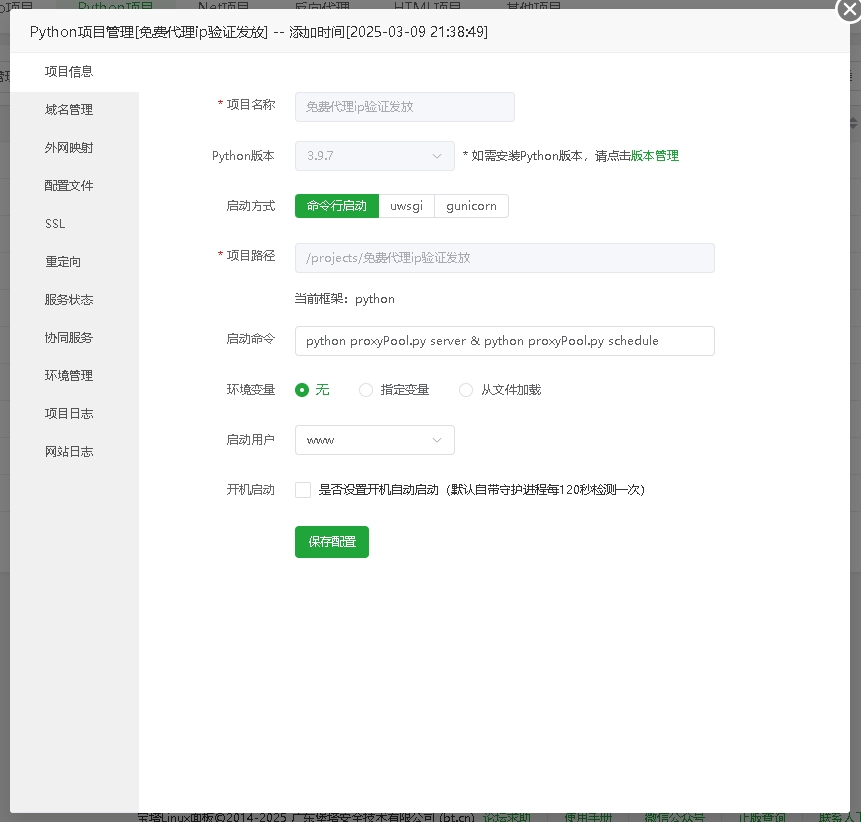
五、Python项目管理器配置项目
六、下载完安装依赖(请使用以下依赖,文件内requirements.txt依赖有些版本不适配会报错)
APScheduler==3.2.0asgiref==3.8.1async-timeout==5.0.1attrs==25.1.0autobahn==24.4.2Automat==24.8.1certifi==2025.1.31cffi==1.17.1chardet==3.0.4Click==7.0constantly==23.10.4cryptography==44.0.2daphne==4.1.2exceptiongroup==1.2.2Flask==1.0gunicorn==19.9.0h11==0.14.0h2==4.2.0hpack==4.1.0Hypercorn==0.17.3hyperframe==6.1.0hyperlink==21.0.0idna==2.7incremental==24.7.2itsdangerous==1.1.0Jinja2==3.0.3lxml==5.3.1MarkupSafe==3.0.2packaging==24.2pip==25.0.1priority==2.0.0pyasn1==0.6.1pyasn1_modules==0.4.1pycparser==2.22pyOpenSSL==25.0.0pytz==2025.1redis==5.2.1requests==2.20.0service-identity==24.2.0setuptools==75.9.1six==1.17.0taskgroup==0.2.2tomli==2.2.1Twisted==24.11.0txaio==23.1.1typing_extensions==4.12.2tzlocal==5.3.1urllib3==1.24.3uvicorn==0.34.0uWSGI==2.0.28Werkzeug==0.15.5wsproto==1.2.0zope.interface==7.2七、配置代理池设置
# -*- coding: utf-8 -*-
"""
-------------------------------------------------
   File Name:     setting.py
   Description :   配置文件
-------------------------------------------------
"""

BANNER = r"""
****************************************************************
*** ______  ********************* ______ *********** _  ********
*** | ___ \_ ******************** | ___ \ ********* | | ********
*** | |_/ / \__ __   __  _ __   _ | |_/ /___ * ___  | | ********
*** |  __/|  _// _ \ \ \/ /| | | ||  __// _ \ / _ \ | | ********
*** | |   | | | (_) | >  < \ |_| || |  | (_) | (_) || |___  ****
*** \_|   |_|  \___/ /_/\_\ \__  |\_|   \___/ \___/ \_____/ ****
****                       __ / /                          *****
************************* /___ / *******************************
*************************       ********************************
****************************************************************
"""

VERSION = "2.4.0"

# ############### server config ###############
HOST = "0.0.0.0"

PORT = 5010

# ############### database config ###################
# db connection uri
# example:
#      Redis: redis://:password@ip:port/db
#      Ssdb:  ssdb://:password@ip:port
DB_CONN = 'redis://aiwrite_1234:@127.0.0.1:6379/0'
# proxy table name
TABLE_NAME = 'use_proxy'
# ###### config the proxy fetch function ######
PROXY_FETCHER = [
    "freeProxy01",
    "freeProxy02",
    "freeProxy03",
    "freeProxy04",
    "freeProxy05",
    "freeProxy06",
    "freeProxy07",
    "freeProxy08",
    "freeProxy09",
    "freeProxy10"
]
# ############# proxy validator #################
# 代理验证目标网站
HTTP_URL = "http://httpbin.org"
HTTPS_URL = "https://www.qq.com"

# 代理验证时超时时间
VERIFY_TIMEOUT = 10
# 近PROXY_CHECK_COUNT次校验中允许的最大失败次数,超过则剔除代理
MAX_FAIL_COUNT = 0
# 近PROXY_CHECK_COUNT次校验中允许的最大失败率,超过则剔除代理
# MAX_FAIL_RATE = 0.1
# proxyCheck时代理数量少于POOL_SIZE_MIN触发抓取
POOL_SIZE_MIN = 20
# ############# scheduler config #################
# Set the timezone for the scheduler forcely (optional)
# If it is running on a VM, and
#   "ValueError: Timezone offset does not match system offset"
#   was raised during scheduling.
# Please uncomment the following line and set a timezone for the scheduler.
# Otherwise it will detect the timezone from the system automatically.
TIMEZONE = "Asia/Shanghai"
八、启动项目
# 如果已经具备运行条件, 可用通过proxyPool.py启动。
# 程序分为: schedule 调度程序 和 server Api服务

# 启动调度程序(方法一)
python proxyPool.py schedule

# 启动webApi服务(方法二)
python proxyPool.py server
九、Docker 运行自行研究,项目里面有配置文件
docker pull jhao104/proxy_pool

docker run --env DB_CONN=redis://:password@ip:port/0 -p 5010:5010 jhao104/proxy_pool:2.4.0
十、部署源码及演示视频

获取资源前请仔细阅读一下声明:
重要提示
如有解压密码: 看下载页、看下载页、看下载页。
源码工具资源类具有可复制性: 建议具有一定思考和动手能力的用户购买。
请谨慎考虑: 小白用户和缺乏思考动手能力者不建议赞助。
虚拟商品购买须知: 虚拟类商品,一经打赏赞助,不支持退款。请谅解,谢谢合作!
声明: 本站所有文章,如无特殊说明或标注,均为本站原创发布。任何个人或组织,在未征得本站同意时,禁止复制、盗用、采集、发布本站内容到任何网站、书籍等各类媒体平台。如若本站内容侵犯了原著者的合法权益,可联系我们进行处理。